Choose a guide, then open the task you need. Instructions and screen examples stay together. Controls vary by model, software and permissions.
Live cameras, recordings, sharing and notifications
On your phone
Get comfortable with DMSS
DMSS is Dahua’s phone app for live cameras, saved footage and supported alerts. Use your own account. Menus and available controls depend on your equipment, app version and permissions.
DMSS app screen examples
DMSS app guide
What would you like to do?
Choose a task below for instructions and screen examples.
Manufacturer screen examples. Your app may look different.
Live viewSaved footage
Find and save a recordingLocate the right camera and time, then export a copy.
1
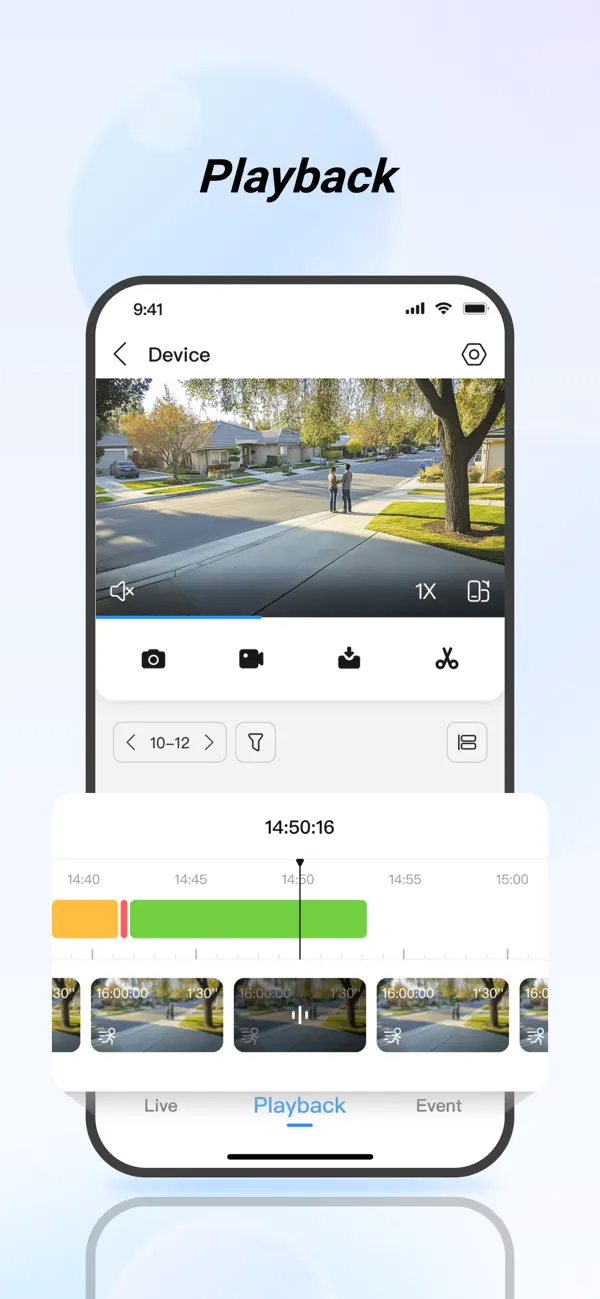
Open Playback
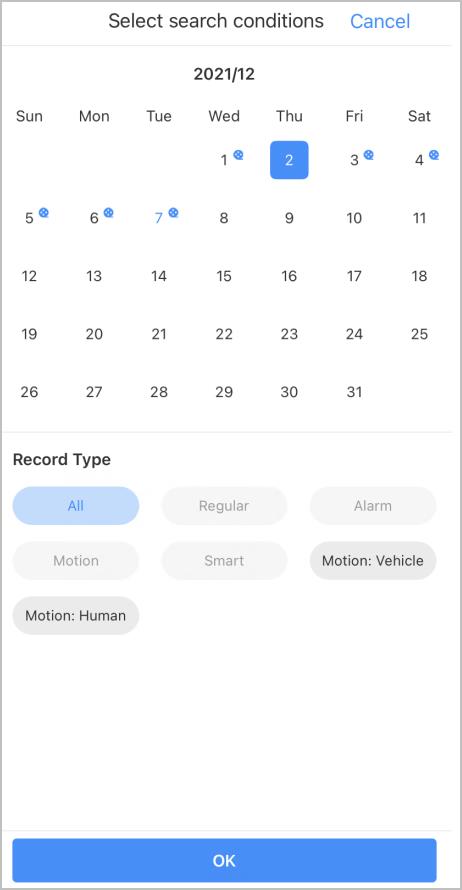
Choose the relevant camera and recording date.
2
Find the time
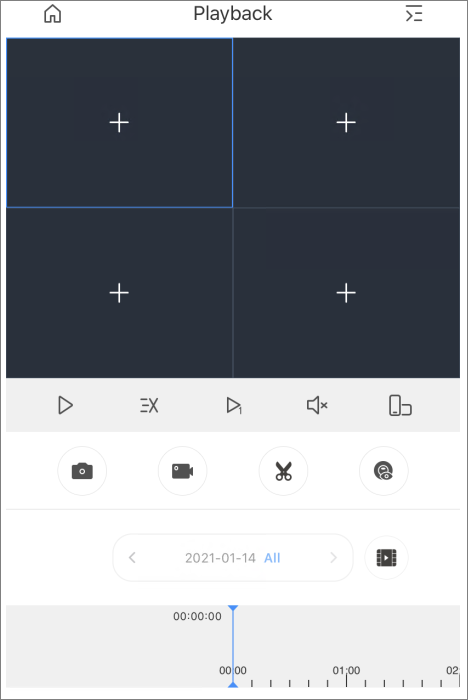
Use the timeline to locate the event. If nothing appears, confirm the camera, date and recording filter.
3
Play the footage
Play the section first and confirm it is the correct camera and time period.
4
Save and check a copy
If your version offers a clip or download option, select the period to save. Wait until it finishes, then open the exported file and check playback.
Export important footage as soon as possible and store it securely away from the recorder. Older recordings can be overwritten.
Show screen example
DMSS Playback: select a date and timeTap the image to enlarge
Manufacturer illustration, not a screenshot of your system. Controls vary by app version, equipment and permissions.
Using an older DMSS layout?
These earlier screen examples show similar controls in different positions. They are reference images, not the next steps in the sequence above.
Show screen examples
Earlier DMSS: calendar and recording filtersTap the image to enlargeEarlier DMSS: playback timeline and controlsTap the image to enlarge
Earlier DMSS interface examples. Match the instructions to the version on your phone.
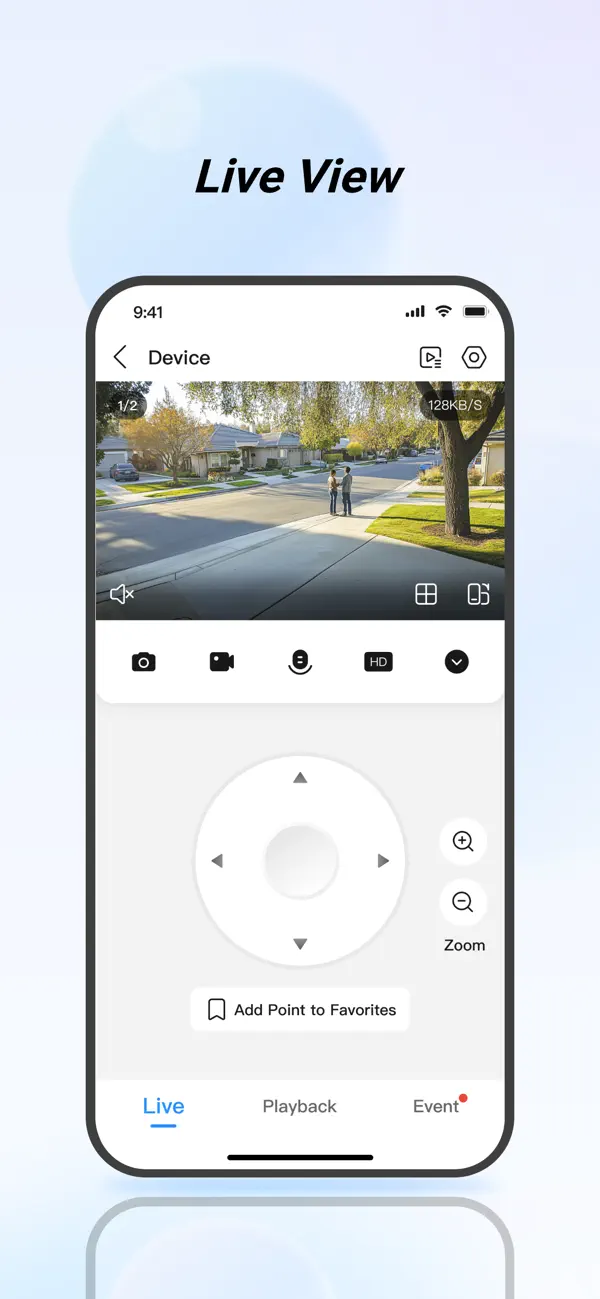
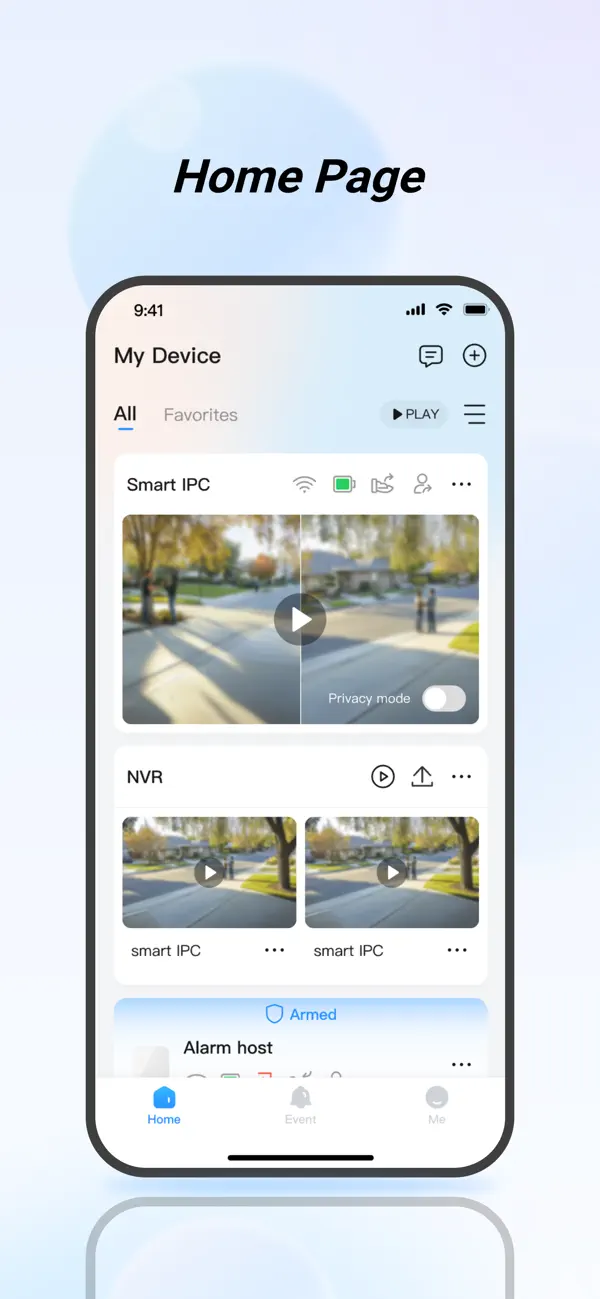
View your cameras liveCheck the current image from a connected camera.
1
Sign in to DMSS
Sign in with your own credentials and keep recovery codes private. Your recorder login may be different from your DMSS account.
2
Select your system
Find the recorder or device in Home or the device list. If it is missing, check which account is signed in before attempting to add it again.
3
Open a camera
Select a camera and confirm the image is live. Audio, zoom and movement controls are available only where the equipment and your permissions allow them.
To confirm recording, open Playback and play a saved clip. Live view checks only the current picture.
Show screen examples
DMSS Home: select your recorderTap the image to enlargeDMSS Live View: view a cameraTap the image to enlarge
Manufacturer illustration, not a screenshot of your system. Controls vary by app version, equipment and permissions.
Add a family member or another userShare access through their own account and choose their permissions.
1
Ask them to create an account
Ask the person to install DMSS and create their own account, then confirm the recipient details.
2
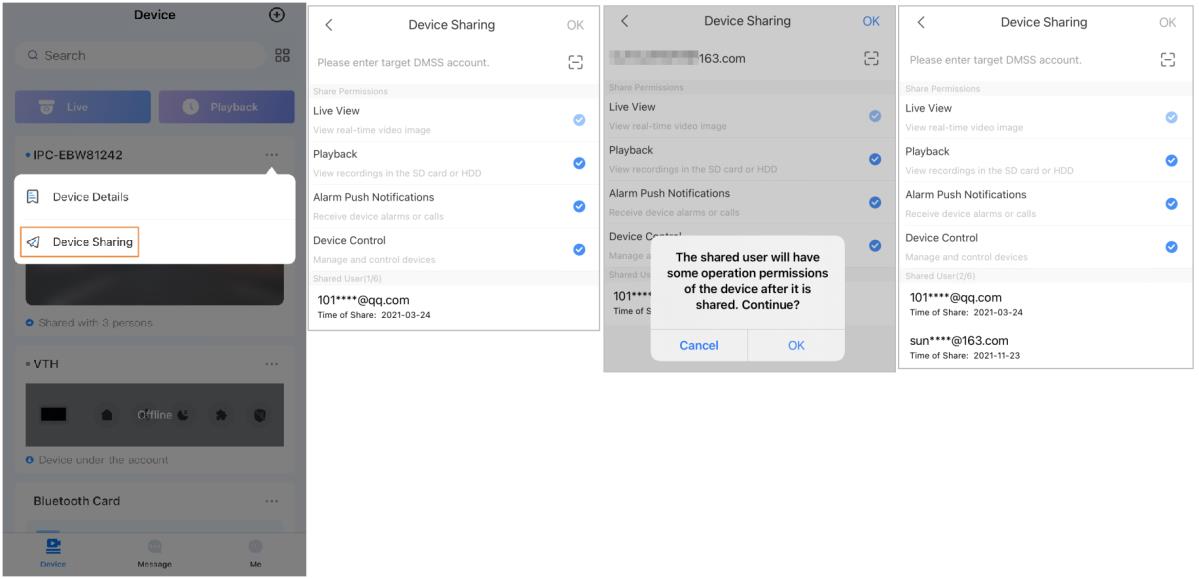
Open Device Sharing
For a device that supports account sharing, open Device Sharing and enter the recipient’s account. If sharing is unavailable, ask for help instead of giving out the administrator password.
3
Choose their permissions
Select only the required cameras and optional permissions. Some sharing arrangements include live view that cannot be switched off. Check the recipient and full permission list before confirming, and ask us if the access is broader than intended.
4
Check their access
Have the recipient open their account and accept any invitation. Check the intended functions together, and review or revoke sharing when their access is no longer needed.
Show screen example
Earlier DMSS interface: Device Sharing and permissionsTap the image to enlarge
Manufacturer illustration, not a screenshot of your system. Controls vary by app version, equipment and permissions.
Check your notificationsCheck the settings and test an alert you already use.
1
Allow phone notifications
Allow DMSS notifications in your phone settings. Also check Focus, Do Not Disturb and battery restrictions.
2
Check the device’s alert settings
Confirm the relevant device alerts are enabled and that the phone and security system are online.
3
Test a configured event
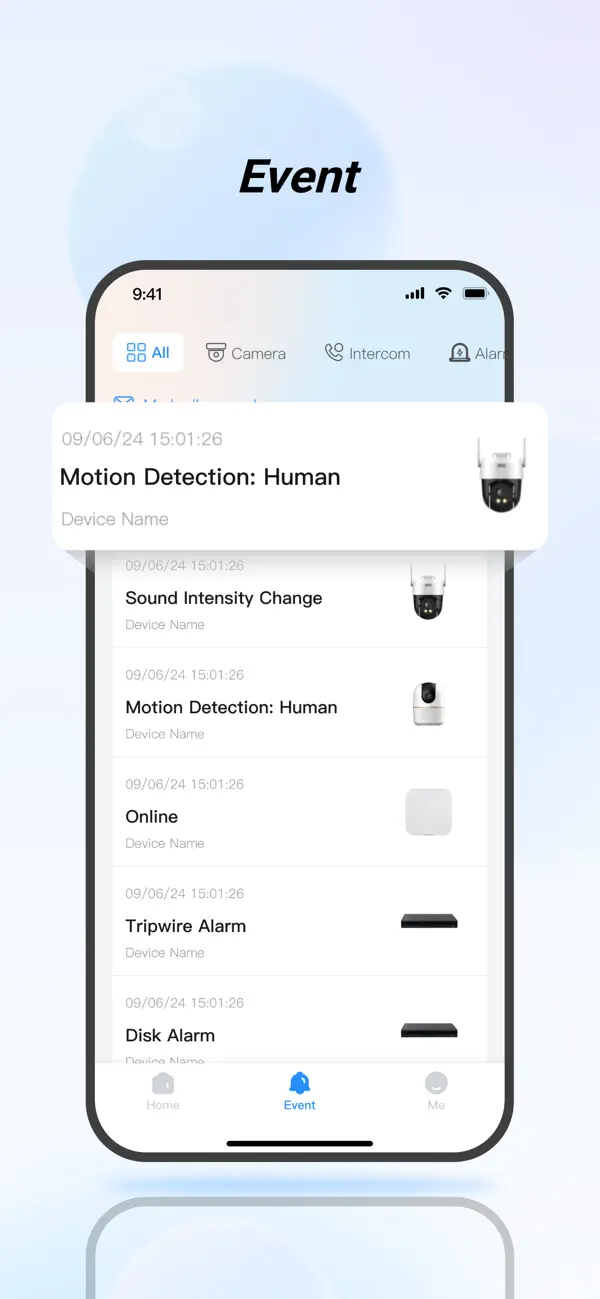
Safely test a configured event, then check the notification and Event or Message list in DMSS. Confirm the associated recording separately in Playback.
If the test fails, tell us the phone type, DMSS version and device involved.
Show screen example
DMSS Event: review device messagesTap the image to enlarge
Manufacturer illustration, not a screenshot of your system. Controls vary by app version, equipment and permissions.
At your recorder
Playback, exports and storage
A network video recorder (NVR) saves footage from connected cameras. These steps use its monitor and mouse; menus and functions vary by model and software version.
Recorder interface examples
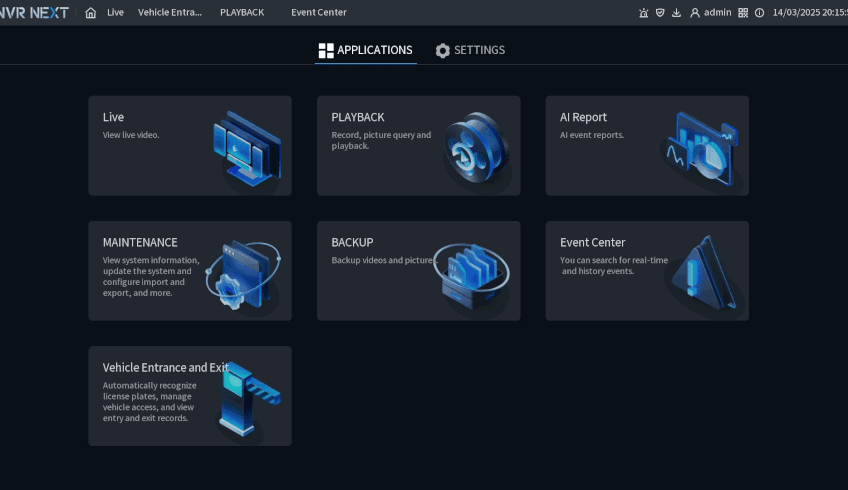
NVR NEXT interface guide
Find the camera. Choose the day. Play the recording.
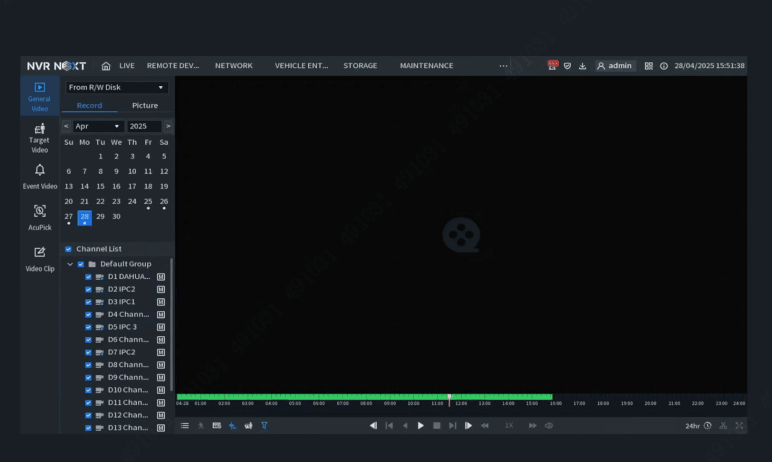
The timeline shows the recorded periods available for your selection. Check both the camera and the date before looking for an event.
NVR NEXT interface example · Select image to enlarge
Find and play footageFind saved footage using the recorder’s monitor and mouse.
1
Sign in
Sign in with an authorised recorder account without sharing administrator credentials.
2
Open Playback
In the NVR NEXT example shown, go to Applications, open Playback and choose General Video. Other interfaces may use different menu names.
3
Choose the camera and day
Select the date and camera from the available lists. A channel is a camera input.
4
Select a recorded time
Choose a recorded period on the timeline. Review any recording-type filter if expected footage is hidden.
5
Play and confirm
Confirm the camera and timestamp. If footage is missing, note the gap and review storage warnings before making changes.
Show screen examples
NVR NEXT interface example: open Playback from ApplicationsTap the image to enlargeNVR NEXT interface example: calendar, cameras and recording timelineTap the image to enlarge
Dahua NVR NEXT interface examples. Availability and menus depend on the recorder and installed software.
Export footage to USBSave important footage outside the recorder.
1
Find the recording first
Play the footage and note the camera and the start and finish times to export.
2
Connect suitable USB storage
Use a supported USB storage device. Do not format it if it contains files you need to keep.
3
Use the export or backup control
Open Backup or Export and select the camera, time range, USB destination and supported format. Controls differ by recorder and firmware; ask for help if the export option is unclear.
4
Check the saved file
Wait for the export to finish before removing the USB. Test the saved file on a suitable device; some formats need specific playback software. Store the original export securely.
Export promptly: a recording left only on the recorder may be overwritten.
Look after your recorderCheck storage, ventilation and power connections.
1
Check storage warnings
Check the storage or hard-drive screen for errors. The hard disk drive (HDD) holds the saved recordings.
2
Keep ventilation clear
Leave ventilation openings clear and maintain the manufacturer’s recommended clearance.
3
Check accessible connections
Keep accessible power connections secure against accidental unplugging. Do not open equipment or work on electrical wiring.
4
Ask before making major changes
Ask us about drive errors, missing footage, firmware or network changes. Preserve recordings and logs; do not format storage or factory-reset the recorder during an investigation.
Monthly CCTV check-up
A practical CCTV check-up
Check each camera and the recorder, then tick the items you have completed. Leave any failed or uncertain item unticked and note what needs attention.
Ticks are temporary: they are not saved or sent to West Protect. Test alerts only if they are configured. This checklist does not guarantee future recording or prevent hardware failure.
Something did not pass?
Record the camera, time and warning message, then report the issue. Do not wait until the next monthly check.
Choose the closest description below. If you contact support, include the affected device, when it happened and any error message.
I cannot view cameras remotelySeparate a recording problem from a phone or internet problem.
1
Compare with the recorder
If a monitor is connected to the recorder, check live video and recent playback there. Local recording may continue without remote viewing, but confirm this by playing a saved clip.
2
Check the connection
Check internet access at the property and on your phone. Confirm the DMSS account and note whether the fault occurs on Wi-Fi, mobile data or both.
3
Check authorised access
If the system is absent from DMSS, check the signed-in account and sharing permissions. Do not try to fix this by deleting or re-registering equipment, sharing administrator logins or opening router ports.
4
Tell us what changed
Tell us whether local live view and playback work, which phones are affected and any recent changes. Leave network and recorder settings unchanged until the fault has been assessed.
A camera is offlineOne camera or the whole system is unavailable.
1
Check what is affected
See whether one camera or every camera is offline. Compare with the recorder’s connected screen if available.
2
Look at accessible connections
Check visible power indicators and cable connections without opening equipment or climbing to cameras.
3
Contact us if it stays offline
Tell us which devices are affected. Leave network settings unchanged until the cause has been assessed.
I cannot find a recordingA time period is missing or playback will not open.
1
Check the search
Confirm the selected camera, date, time and recording-type filter.
2
Check available history
Look for storage warnings and whether the footage is older than the recordings still available.
3
Preserve what is available
Do not format the drive, reset the recorder or clear logs. Keep any remaining relevant footage and contact us promptly. Recovery depends on the cause and storage condition and may not be possible.
Notifications are not arrivingDMSS is not sending the alerts you expect.
1
Check your phone
Allow DMSS notifications and review Focus, Do Not Disturb and battery restrictions.
2
Check your system
Confirm the relevant device alerts are enabled and that your phone and property have internet access.
3
Test and report
Test a configured event safely. If notifications still fail, contact us with your phone type, app version and affected device.
I have forgotten my passwordHelp with your DMSS account or recorder login.
Use the official account-recovery process or contact West Protect. DMSS and the recorder may use separate credentials.
We may need to confirm ownership or authority. Keep recovery codes private and get advice before resetting equipment.
I noticed unfamiliar account accessReview access and secure the affected account.
1
Secure the account
From a device you trust, change the affected password. Review shared users and use any supported option to end unfamiliar sessions.
2
Check recovery details
Review account recovery information and your email account. Keep relevant notices and screenshots.
3
Get the right support
Contact us for technical support with access to your CCTV system. For specialist cyber security advice, assessment or support, contact an IT specialist and use the Australian Cyber Security Centre guidance below.
Refer to your handover instructions and the manual for the installed model. The guidance below supports those instructions; it does not replace model-specific testing or servicing.
Check your alarmReview faults, arming, alerts and battery warnings.
1
Read the status
Note any fault, tamper or low-battery message and the device named. Do not dismiss a recurring warning without finding the cause.
2
Arrange the test
Follow your system's test instructions. Tell other users first and arrange any required test period with your professional monitoring provider before triggering devices. Do not test a panic button without the appropriate arrangements.
3
Check the agreed functions
Check the arming modes, relevant sensors, sirens and notifications included in your operating instructions. An app alert does not confirm that a monitoring provider received it or that anyone responded.
4
Arrange maintenance
Report failed checks or battery warnings. Use only specified replacement batteries where user replacement is permitted. Leave control panels, mains connections and specialist servicing to appropriate personnel.
An intercom call or release is not workingIdentify which part of the entrance system is affected.
1
Compare answering points
Check whether a call reaches the indoor station, phone or neither. Note whether video and two-way speech work. Keep the entrance attended during testing.
2
Check phone settings
For mobile answering, check the phone's connection, notification permissions and the authorised account. A working indoor station does not prove remote answering is connected.
3
Report release faults
If the call works but the door or gate does not release, record the symptoms and ask for support. Do not bridge terminals, bypass locks or alter power supplies. Stop testing if movement or locking is unsafe.
Speaking to a visitor and recording a conversation are different uses. Read the audio and privacy guidance before enabling recording.
Review users or a lost fobKeep access permissions current without sharing administrator logins.
1
Confirm who may make changes
Use the authorised administrator and the process agreed for the property. For shared premises, confirm who has authority before changing another person’s access.
2
Remove access that is no longer needed
Use supported controls to revoke a lost credential or a departing user's permissions. If you cannot do this, contact support with the affected user or credential identifier. Do not send passwords or access codes.
3
Review and test permissions
Check required doors, times and any temporary access. Test agreed changes with authorised users while preserving safe exit. Keep a record of the change and who approved it.
Manufacturer reference library
Find your model manual.
Enter the model on your device label or handover documents. Open a result to see its official document links. Match the complete model suffix and software version.
Filter by equipment or package
18 document entries shown.
Alarms · User manualWireless Alarm Hub 2ARC3800H-W2
Alarm Hub 2 User Manual · V1.1.3
These package hubs use Ethernet/Wi-Fi. The family manual also describes cellular variants; SIM and cellular features are not included in ARC3800H-W2.
CCTV recorder and camera models, and the included PoE switch model, vary by installation. Ask for the exact manual with the model from your device label. Keep passwords, serial numbers, QR codes and recovery codes private. Leave wiring, firmware changes, resets and specialist servicing to the appropriate installer.
Official manufacturer links checked 9 October 2026. Links and available versions can change. A datasheet, quick-start guide and user manual are labelled separately.